Welcome to the wonderful world of coral fragging! Think of it as underwater gardening, so whether you’re a seasoned reef-keeper or just starting out, fragging is a fantastic way to expand your coral collection and share the love with fellow reefers.
It’s like giving your corals a little haircut and watching the offcuts grow into new, full-sized beauties. Don’t worry if you’re feeling a bit nervous – we’ve all been there!
I’m here to guide you through each snip and clip, turning you into a coral fragging pro in no time. So, grab your tools, roll up your sleeves (or, well, maybe just tuck them into your wetsuit), and let’s get fragging!
Table of Contents
What is coral fragging?
Coral fragging is essentially the process of cloning your existing corals to propagate new ones, a practice that’s popular amongst reef aquarium hobbyists. It involves carefully cutting or snapping a piece of a coral, known as a frag, which can then grow into a new colony.
1. Preparation
I am sure you are ready to jump in with the first question, how to frag a coral? But hold on – before you dive in, let’s make sure you and your precious corals are safe and sound. A little preparation goes a long way.
A. Safety Measures
- Protect Yourself: Remember, corals can sometimes release toxins when they feel stressed. Put on gloves as a shield for your hands, and safety glasses are always a good idea for extra protection. Also use a dust mask to prevent inhaling any tiny coral particles as you cut, especially with SPS corals. You don’t want any unexpected surprises!
- Keep it Clean: Think of it like a coral surgery. Sanitizing your fragging tools with salt water or a touch of mild bleach (followed by a saltwater rinse) is important. It’s like preventing an infection – we want healthy, happy corals!
B. Gather Your Equipment
- The Right Tools for the Job: Think of your tools like a surgeon’s instruments. Choose the best options for your coral type like like a razor blade, coral clippers, or bone cutters for precise cuts (sharp scissors could also work). Bone cutters are often a go-to for SPS (Small Polyp Stony) corals, while sharp shears or a scalpel work wonders on soft corals and LPS (Large Polyp Stony) like the Scoly Coral. And remember – sharp tools mean less stress on your corals, resulting in a better recovery!
- Secure Mounting: Frag plugs or discs are like tiny coral homes. Pick a size and material that works best for you and your tank. Have reef-safe glue/superglue gel or epoxy on hand for attaching the coral frags to live rock or frag plugs. A rubber band may sometimes be used to secure the frags onto the base.
- Prepare Your Solutions: Imagine a coral spa! Separate containers of clean saltwater are essential – one for the fragging itself, and one for rinsing off debris and mucus from your newly created frags. A soft-bristled brush can help gently dislodge any extra bits.
C. Setting Up Your Coral Workspace
- A well-lit workspace is your friend. Imagine trying to do intricate work in the dark – not ideal! Good lighting is key for precision fragging.
- Choose a flat, sturdy surface for your workspace. You don’t want any wobbles when you’re working with delicate coral fragments
- Arrange your tools and containers within easy reach. This might sound simple, but efficiency makes fragging so much more enjoyable!
By following these steps and maintaining clean practices, you are setting the stage for your coral propagation endeavors to flourish.
2. The Fragging Process
The purpose of coral fragging is to promote growth and proliferation of corals in your home aquarium. A successful fragging process involves careful selection of the coral, precise cutting technique, and secure attachment of the new fragments.
A. Coral Selection
You must choose a coral that is healthy and has shown steady growth within your aquarium. For Small Stony Corals (SPS) like the Bird’s Nest. Next, look for robust branching, and for mushroom corals, opt for those with a full and well-developed cap structure.
A thriving coral colony demonstrates healing abilities after the fragging process and ensures the best start for new fragments.
B. Cutting Technique
The right cutting technique depends on the type of coral you’re working with:
- Soft Corals (Mushrooms, Xenia, Leathers, etc.): A sharp razor blade, X-Acto knife, or even scissors can be used for clean cuts. You might even be able to cut some leather and branching soft corals underwater for ease.
- Stony Corals (SPS and LPS): In branching corals consider using coral cutters or garden pruners to cut through branching structures like Torches, Acropora, Duncan, and Hammers corals. Target the base of the branch for a clean break. In encrusting corals a coral bandsaw is ideal for species like Goniopora, Acanthastria, and Chalice, where you need to slice through a thicker skeleton and tissue.

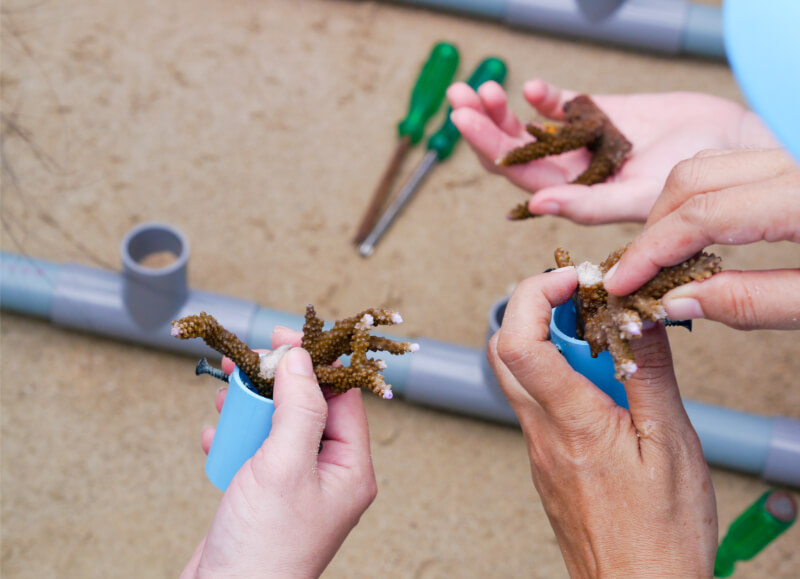
C. Attaching Fragments
After cutting, your new frag needs a foundation to grow on. Here are common methods:
- Soft Corals: These attach easily to rock on their own. You can temporarily secure them with rubber bands or reef glue until they naturally attach.
- Stony Corals: Superglue gel or reef-safe epoxy works best. Larger LPS need a sturdy epoxy foundation before being attached to the rock. And, smaller SPS like montipora and Acropora corals can be directly glued to rocks or frag plugs.
- Encrusting Corals: For these, it’s easiest to glue their mount (frag plug or rock) directly to your aquarium rocks, allowing them to naturally spread.
Step-by-Step Coral Fragging Guide
If you like numbered instructions, the next list of items will make it easier to understand the coral fragging process.
- Coral Selection: Choose a healthy coral and gently remove it from the tank. For some species, fragging may need to happen inside the aquarium.
- Set-Up: Place the coral in a small, clean container. Prepare your workspace with clean and sharp cutting tools.
- The Cut: For corals with large polyps, gently wave your hand over them before removing them from the water to encourage the polyps to retract, preventing tissue damage. Using your chosen tool, carefully make the cut to create the frag.
- Healing Dip: Place the frag in a container filled with aquarium water. Don’t worry if you see stringy material- this is a natural protective response.
- Attachment: Select your method (glue, epoxy, rubber band) and carefully secure the frag to its new substrate. Be patient and gentle to avoid dislodging it.
- Placement: Place the frag in a suitable location with lower water flow until it attaches fully. Return the mother colony to its original spot.
- Growth and Removal: Once the coral grows and attaches firmly, you can remove any temporary bands and permanently place your new coral in its final spot.
Author Note: Remember, coral fragging is both an art and a science, so be patient and gentle throughout the fragging process to give your corals the best chance at successful propagation.
Tips and Tricks
Frag no more than 25-30% of a mother colony at a time to allow for healing.
Ensure the air temperature is around the mid-70s Fahrenheit and not too dry during out-of-water fragging. Return the coral to the tank within 15 minutes.
Remember, coral fragging is both an art and a science, so be patient and gentle throughout the fragging process to give your corals the best chance at successful propagation.
3. Aftercare and Growth
Once your coral frags have been safely cut and secured, proper aftercare is vital for coral frag health and will determine the success of your reef aquarium. This involves diligent monitoring, preventative measures against infection, and fostering an environment conducive to growth.
A. Monitoring and Maintenance
Consistently check water parameters to maintain stability, as fluctuations can be detrimental to the fragile frags. You should monitor parameters like alkalinity, calcium, and magnesium levels in addition to pH, nitrate, and phosphate. Routine inspections for algae growth or signs of distress in your frags are also crucial.
- Alkalinity: 8-12 dKH
- Calcium: 350-450 ppm
- Magnesium: 1250-1350 ppm
- pH: 8.1-8.4
- Temperature: 76-78°F (24-26°C)
- Specific Gravity: 1.025-1.026
These ranges are suitable for many corals but always research the specific needs of your chosen species.
Act swiftly if coral polyps are retracted for extended periods or if tissue recession or color loss is observed – color changes can be another major stress indicator. These factors could indicate poor water quality affecting your frags.
B. Preventing Infection
Frags are susceptible to bacterial and fungal infections, especially at the cut site. Maintain high water quality and reduce pathogens by using UV sterilizers or ozone generators if necessary.
Apply a coral dip solution to your frags before adding them back into the main aquarium to minimize infection risks. This practice can be particularly useful for soft corals and mushroom coral, which are more prone to infection due to their fleshy nature.
For optimal safety, place newly fragged corals in a dedicated quarantine tank for a period of observation. This greatly reduces the risk of introducing pests to your main display.
Important Note: Never mix different coral dip solutions! Always rinse dipped corals thoroughly before adding them to your aquarium.
C. Growth and Propagation
Successful reef aquarium hobbyists understand that patience is key when waiting for frags to show significant growth. Provide optimal conditions, including proper lighting and water flow, which are essential for different species:
- Montipora and Acropora: Require high lighting and flow.
- Soft Corals: Prefer moderate flow and lighting.
Author Note: Encourage growth by supplementing with amino acids and other vital nutrients that support coral health. Regular feeding of zooplankton can promote polyp extension and growth as well.
Monitor your frags’ progress and strategically increase their numbers by fragging corals when they mature and spread onto the live rock rubble or reef glue. New hobbyists should start with hardier species that are more forgiving and suitable for beginners.
4. Ethical Practices and Conservation
When you embark on coral fragging, your role transcends that of a hobbyist to a steward of marine life. Local fish stores and aquarists alike must adhere to ethical practices to ensure the sustainability and health of coral ecosystems.
Creating the frag should always be done with mindfulness towards coral conservation. Favor aquacultured specimens over wild-collected corals to avoid depleting natural reefs. By propagating corals sustainably in your aquarium, you’re actively contributing to reef conservation and easing the demand for wild-caught corals.
Consider these pointers for responsible propagation:
- Educate Yourself: Resources like Albert Ulrich’s “The New Saltwater Aquarium Guide” and publications such as “Aquarium Fish International” offer invaluable insights on coral care.
- Support Sustainable Trade: Patronize stores that prioritize sustainable practices.
- Share Knowledge: Join forums like Aquademia to exchange information and learn from mistakes of others in the community.
- Monitor Health: Ensure frags show signs of recovery and growth before trading or selling them, promoting the welfare of the corals.
Your practices in fragging not only impact your home aquarium but echo throughout the broader conservation efforts. It’s your responsibility to stay informed and conscientious in the way you propagate, trade, and maintain corals.
Conclusion
And just like that, you are now ready to do some fragging! Give yourself a pat on the back – you’ve taken a big step in becoming a true reef tank maestro.
Remember, fragging is not just about growing your coral collection; it’s about being a part of the larger reef-keeping community, sharing pieces of your underwater world with others, and contributing to sustainable reef-keeping practices.
So, celebrate each new growth and every successful frag. If you are sharing cool photos of your corals on social media don’t forget to tag us on Facebook. If you are looking to learn more about corals check our Lobo Coral Care Guide and if you have any questions don’t hesitate to reach out to us. We wish you the best!
FAQs
How much can you make fragging coral?
$1,200 to $3,500 a month if you are willing to put lots of time and over $5,000 upfront in equipment. Operating expenses will be close to $1,000/month so trading LFS corals at the store might be a better idea.
When to start fragging corals?
4-6 months after you brought a new coral into your aquarium would be the minimum recommended time to start fragging. Some corals like the Goniopora Coral might not show signs of sickness until 6 months later.
Which dremel model will be best for coral fragging?
The Dremel 8220-1/28 12-Volt Max Cordless Rotary Tool is a good coral fragging tool as long as it is used with a Diamond Cutting Wheel for precision and clean cuts.
What are the easiest and best corals to frag?
SPS fast growing corals like Mushroom, Toadstool Leather, Bird’s Nest, Green Star Polyps, Torch, Candy Cane and Plate corals are among the best to frag.
What are the most difficult corals to frag?
LPS corals are usually not recommended for fragging due to how to difficult it is. The list includes Goniopora, Acropora and Sun corals, and some that just can’t be fragged are Trachyphyllia Scolymia and Acanthophyllia corals.
